Introduction
After developing a Django application, we often need to deploy the application. DirectAdmin and cPanel are two popular web hosting control panels that make it easy to manage your website and its backend files. Many prefer them because they are easy to use, and secure and provide file management, database management, and email management features. In this article, I will show you how to deploy a Django application to DirectAdmin/cPanel using a few simple steps.
How to deploy a Django Application on DirectAdmin/cPanel
For this article, I assume that you already have a Django application ready to be deployed.
1. Preparing for deployment
There of course few things you need to do to your local project before deploying it on DirectAdmin which also applies on Cpanel. I currently use DirectAdmin, and examples are based on such, though I once used CPanel for Django deployment.
a. How to check DirectAdmin MySQL Server version.
You need to know your MySQL server version as it determines the Django version it supports. Both DirectAdmin and Cpanel use MySQL servers.
i. Login to your DirectAdmin
ii. If you don't have any database on your server, go to Step 1d(i) to create a database as one can't login as explained in below ( steps iii - v)
iii. On the dashboard, Select the phpMyAdmin under Extra Features.
iv. Enter your DirectAdmin username and password or existing database user and password to log in
v. On the MySQL dashboard, see the Server version under the Database Server section.
If your database version is 5.*.*, use the Django version less than 4.2. Versions of Django 4.2 and above don't work with MySQL versions 5.*.* otherwise those with MySQL versions 8.* can use Django 4.2 and above.
You also need to add mysqlclient to your requirements.txt file. The file should be in your folder containing the "manage.py" file.
b. Serve static files
To server your static files like js and css, you need to add whitenoise (whitenoise == 6.5.0) to the requirements.txt file and "whitenoise.middleware.WhiteNoiseMiddleware" to settings.py middleware just under "Django.middleware.security.SecurityMiddleware" otherwise your css and javascript won't work or won't be found.
c. Requirements
Up to now, your requirements.txt file should have the below contents as a minimum. You may add other packages as required by your project. Take note that this file should be in the same directory as your manage.py. It's important to have requirements.txt otherwise you will need to install the project's required packages 1 by 1.
NB: The version of packages are the latest versions for whitenoise and mysqlclient.
Django == 4.1.11 # or higher for MySQL v 8.*
whitenoise == 6.5.0
mysqlclient == 2.2.0
d. Configure Database
As said before, we shall be using a MySQL database for this deployment.
i. Creating Deployment Database
- On your DirectAdmin, select MySQL Management under Account Manager,
- select CREATE NEW DATABASE.
- Fill in the database name as shown in the picture below.
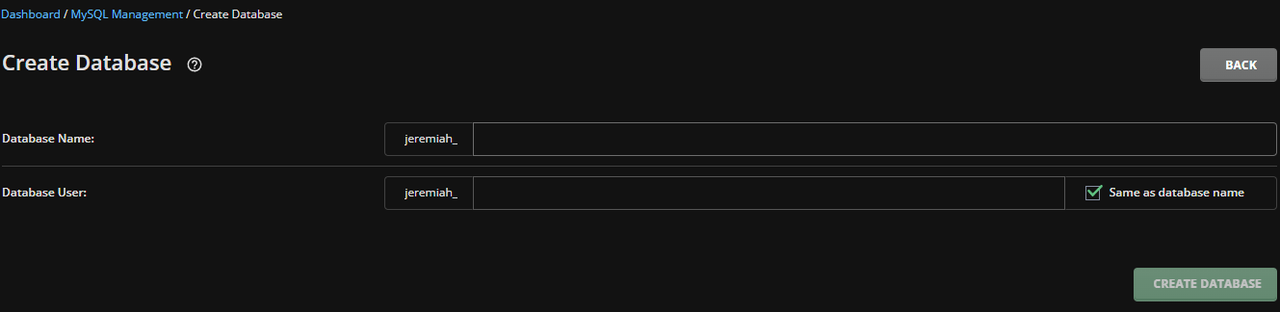
NB: You may select Database User to be the same as the database name or deactivate that to add the database user name of your choice.
As soon as you add the database name and user name, you will see the Database Password form field on which you have to enter your password. Choose a strong password for security reasons. Once you enter the password, the CREATE DATABASE button will be clickable. Click it to create the database and user.
ii. Project Database Settings
You will see a pop-up with your database details. Copy the database name and username. password and host, and put them onto the project settings.py to configure the database connection as shown below.
NB: Remove the default SQLite database configuration and the database file.
DATABASES = {
            "default": {
                "ENGINE": "django.db.backends.mysql",
                "NAME": "****",
                "USER": "****",
                "PASSWORD": "****",
                "HOST": "localhost",
                Add OPTIONS key to your db settings as below.
                "OPTIONS": {
                 "init_command": "SET sql_mode='STRICT_TRANS_TABLES'",
                 },
            },
}e. Additional Project Settings
- Set the static root and add your domain name to allowed hosts in settings.py as shown below
- Add the staticfiles folder in your folder where manage.py is located.
STATIC_ROOT = Path(BASE_DIR, "staticfiles")
ALLOWED_HOSTS = ["example.com"]
Your project structure should be like in the below pic. If you have any Django project apps, they will also be here.

2. Uploading codebase
a. Creating folders
For file organisation purposes, log in to your control panel, select File Manager under System Info & Files and create a directory/folder called repositories in the home folder where we may put all our Django apps. This directory permissions should be set to 755. This is done by right-clicking on the repositories folder which should be on the right window of File Manager. Upon clicking, choose Set Permissions. The easier way to set permissions is by typing 755 under Chmod and saving.
NB: If this is not fixed, the "Apache doesn't have read permissions to that file. Please fix the relevant file permissions." error will be displayed when you visit the root URL of your website.
b. Upload code
Then upload the Django application files to that directory.
i. One easiest method is to create a zipped folder of your local project folder and then upload the folder to the repositories folder.
To upload your zipped folder to the repositories folder, open the repositories folder on the server, and drag the local zipped file to the repositories folder in DirectAdmin. You can also right-click inside the repositories folder and select the upload files option. Once the codebase is uploaded, right-click on the zipped file and Extract to extract files and folders in the project folder. For the extraction path, write, /repositories and click Extract.
When the extraction is complete, you will see the extracted folder in the repositories folder, in my case, the demo1 folder. Now, open the demo1 folder, and you should see the Django project where your manage.py among others is stored.
ii. You may as well use git to do this. It is beyond the scope of this text to use git, but that we shall do later.
3. Creating the Python App
a. Create Python App
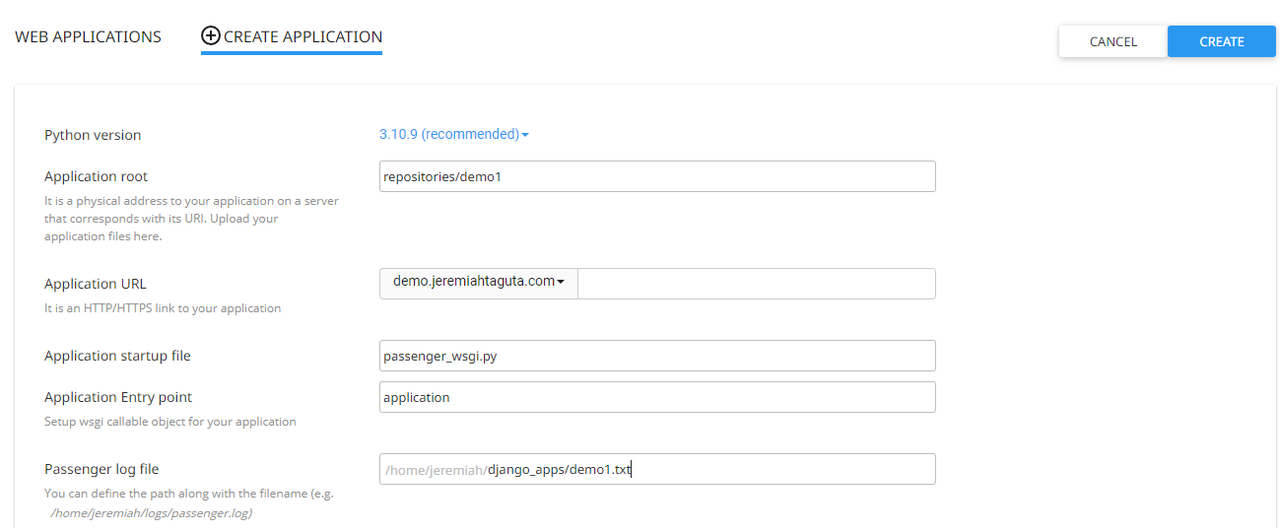
Click Set Python App on the dashboard, On DirectAdmin, it is under Extra Features then click CREARE APPLICATION as shown below.

b. Fill in the form
Fill out the form shown below the picture
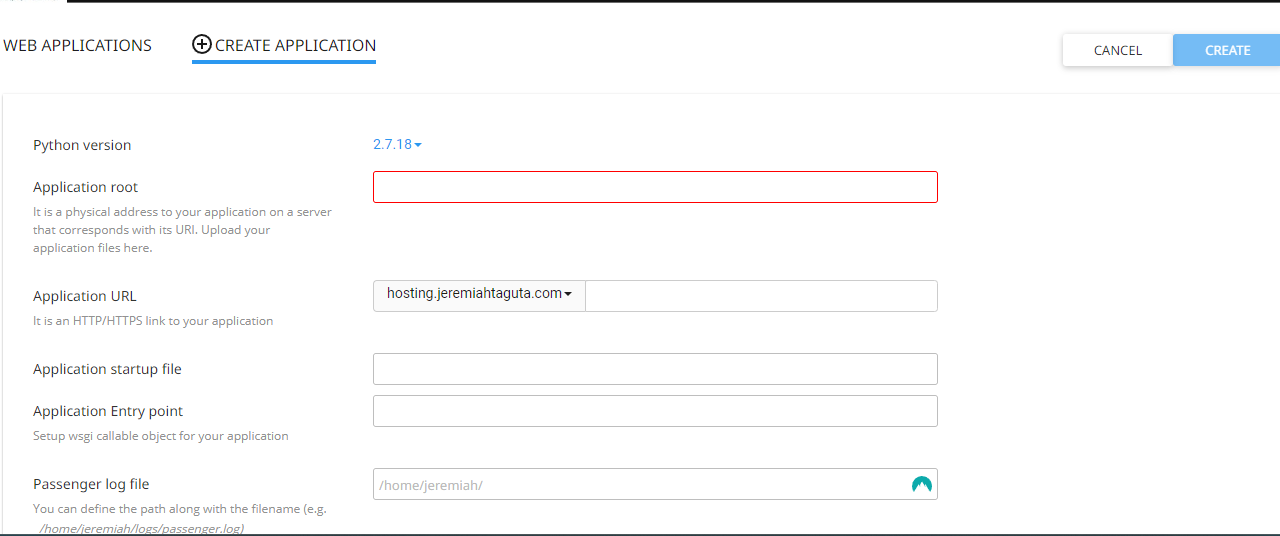
i. Choose the Python version
Choose 3.10 recommended
ii. Application root
It is a physical address to your application on a server that corresponds with its URI. This is the folder which we uploaded, demo1, in my case.
repositories/demo1
iii. Application URL
It is an HTTP/HTTPS link to your application. Select an unused domain from the drop-down. In my case, demo.jeremiahtaguta.com. This implies that demo.jeremiahtaguta.com is my application's default URL. If I wanted the default URL to be "demo.jeremiahtaguta.com/site/", I would have typed "site" next to the Application URL domain dropdown with demo.jeremiahtaguta.com chosen.
iv. Application startup file
Put passenger_wsgi.py
v. Application Entry point
This is the WSGI callable object for your application. Put application
vi. Passenger log file
You can define the path along with the filename (e.g. /home/{name}/logs/passenger.log). The "/home/{name}/" will be there by default, just add the subdirectory, logs, and the file, passenger.log. The subdirectory and filename may be of your choice. In my case, I will type the following,
django_apps/demo1.txt
Make sure you create the subdirectory in the home directory and the log file subdirectory. If a logs subdirectory exists, just add the log file as log files of many apps that can share the subdirectory.
c. Saving the form
Below is the typical data on the create application form. Make sure you completed yours.
-
Click CREATE and the app will be created and started.
-
pop-up will show close to the CREATE button showing success or error messages.
-
Once the app is created, the following will appear.
- Any errors will show next to the CREATE button. Refer to section 4 on possible errors to see common errors and their solutions
-
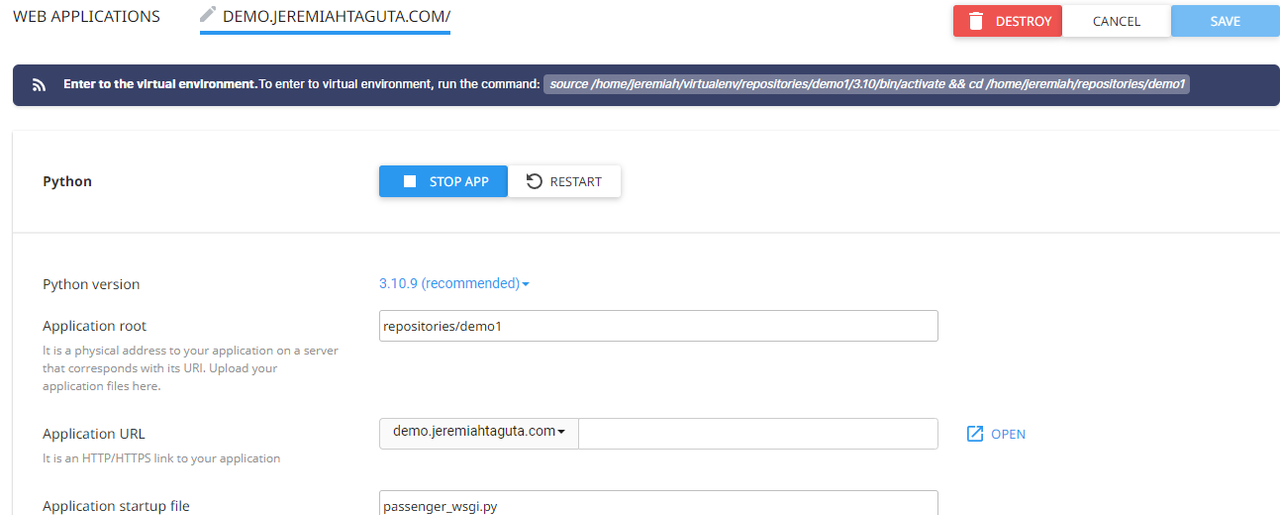
Now, it's time to stop the application from running by clicking the STOP APP button.
d. Config
Below is the config section.
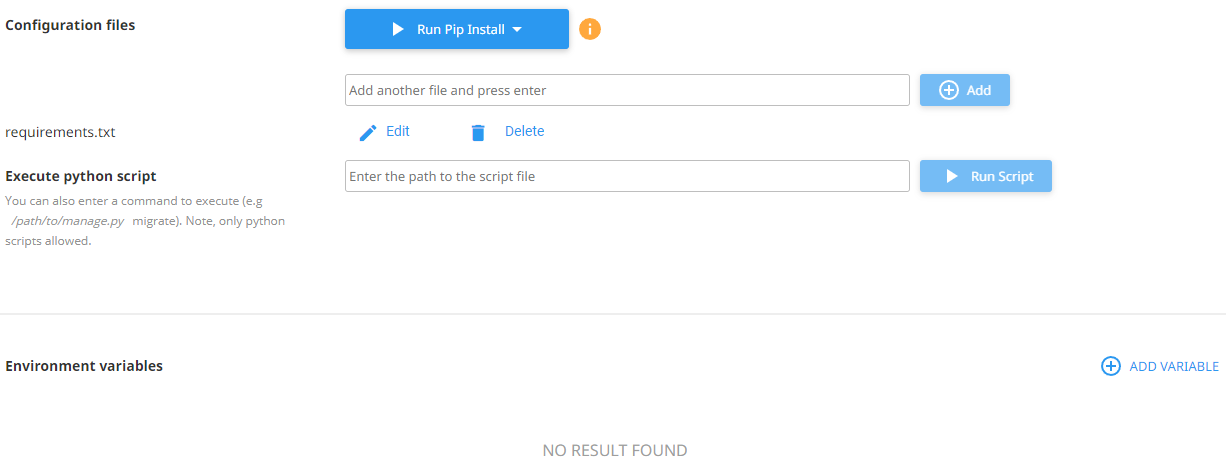
- Under config files, type requirements.txt or any file name in which your project package requirements are listed. After typing the file name, the "Add" button will be clickable, click it.
- The run pip install button will be activated, click it to install requirements
- A dropdown will appear showing your requirements file, click it to run it
- the running bubbles will appear as in pic below. If no error, you will see PIP Install completed successfully next to the CREATE button. Any errors will show here. Refer to section 4 on possible errors to see common errors and their solutions.
e. Passenger file
It's now time to change the passenger file. Open the File Manager, go to our project folder and the passenger_wsgi.py will now be there. It is automatically created when we create the Python application in step 3c.
The passenger_wsgi.py will have the following:
import imp
import os
import sys

sys.path.insert(0, os.path.dirname(__file__))
wsgi = imp.load_source('wsgi', 'passenger_wsgi.py')
application = wsgi.application- Replace everything with
from demo1.wsgi import applicationthen save. - replace demo1 with the name of your Django project.
f. Executing Python scripts
Type the commands on the form on the right of the Execute python script label and click Run script. Errors or successes will show on the window below the Execute python script.
i. manage.py collectstatic --noinput
The manage.py collectstatic --noinput command is used in Django to collect all of the static files in your project into a single directory. The one set as STATIC_ROOT in settings.py to be precise. These static files can include CSS, JavaScript, images, and any other assets that your project uses. The --noinput flag is typically used when running this command in a non-interactive environment, such as during deployment or in a script hence its application in our case. This stops Django from prompting you for confirmation before overwriting existing static files.
Before running this script which will collect static files, make sure that:
- STATIC_ROOT is set in settings.py as explained earlier.
- Make sure the staticfiles directory or any asset in STATIC_ROOT exists in the current working directory, that is, our demo1 directory housing our project.
ii. manage.py migrate
To apply your database migrations, run this command.
iii. manage.py createsuperuser
You need to access the terminal and enter the virtual environment as explained below in section 4(d). Then create super user from there by running python manage.py createsuperuser.
When done, click the SAVE button at the top and start the application. Open its URL. In my case, https://demo.jeremiahtaguta.com/ shows the Django running page as it's just a demo and I have no project applications yet as seen below. However, https://demo.jeremiahtaguta.com/ won't be available as it was created just for this article.
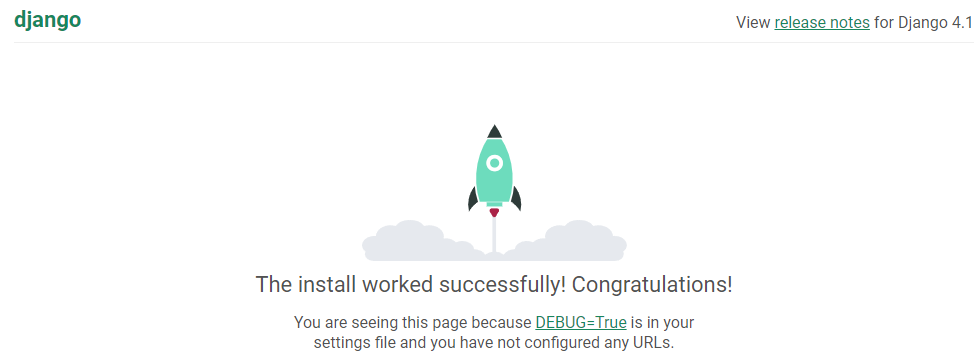
Congrats on your Python application deployment. If you get any errors, check below common errors and their solutions.
NB for every change made we need to save the progress of the app.
4. Possible Deployment Errors and Solutions
Check the log file created in section 3(vi) for any errors if you are getting errors on running migrations or opening the website URL.
NB: Any error fixes/changes need an app restart to ensure changes are propagated to the app.
a. Passenger File
If you open your website and it's not showing the expected web page, please open the log file. If you see the following error
/opt/passenger/src/helper-scripts/wsgi-loader.py:26: DeprecationWarning: the imp module is deprecated in favour of importlib and slated for removal in Python 3.12; see the module's documentation for alternative uses App 3714029 output: import sys, os, io, re, imp, threading, signal, traceback, socket, select, struct, logging, errno App 3714029 output: Traceback (most recent call last): App 3714029 output: File "/opt/passenger/src/helper-scripts/wsgi-loader.py", line 369, in App 3714029 output: app_module = load_app() App 3714029 output: File "/opt/passenger/src/helper-scripts/wsgi-loader.py", line 76, in load_app App 3714029 output: return imp.load_source('passenger_wsgi', startup_file) App 3714029 output: File "/opt/alt/python310/lib64/python3.10/imp.py", line 172, in load_source App 3714029 output: module = _load(spec) App 3714029 output: File "", line 719, in _load App 3714029 output: File "", line 688, in _load_unlocked App 3714029 output: File "", line 883, in exec_module App 3714029 output: File "", line 241, in _call_with_frames_removed App 3714029 output: File "/home/jeremiah/repositories/demo1/passenger_wsgi.py", line 8, in App 3714029 output: wsgi = imp.load_source('wsgi', 'passenger_wsgi.py') App 3714029 output: File "/opt/alt/python310/lib64/python3.10/imp.py", line 172, in load_source App 3714029 output: module = _load(spec).....
Fix
Remove everything in passenger_wsgi.py and put from demo1.wsgi import application
NB Replace "demo1" with your project name.
b. Apache doesn't have read permissions
On opening the website, if you see the following error message:
Apache doesn't have read permissions to that folder relevant file permissions.
Fix
Change your repositories and project folder permissions to 755 as explained before in section 2(a).
c. Error 500
On opening a web page where database data is to be retrieved, if error 500 shows up, open the log file. If you see
raise NotSupportedError( App 1711664 output: django.db.utils.NotSupportedError: MySQL 8 or later is required (found 5.*.*).
This is because of the DB connection
Fix
Replace the requirements.txt Django version to less than 4.2 and click Run Pip Install to support lower MySQL as explained in 3(d) above.
Django == 4.1.11d. Passenger Error
On opening the URL, if you get an error
Passenger error #2 An error occurred while trying to access '/home/{username}/repositories/{project}/Passengerfile.json': Error opening '/home/jeremiah/repositories/charishop/Passengerfile.json' for reading: Permission denied (errno=13)
Fix
Set your repositories and project folder permission to 755 as in 2(a) above.
e. Pip version
On trying to install packages, the following error can be displayed close to the maximise button:
Fix
an error like error: subprocess-exited-with-error × python setup.py egg_info did not run successfully. │ exit code: 1 ╰─> See above for output. note: This error originates from a subprocess, and is likely not a problem with pip.error: metadata-generation-failed× Encountered error while generating package metadata.╰─> See above for output.note: This is an issue with the package mentioned above, not pip.hint: See above for details.[notice] A new release of pip is available: 23.1.2 -> 23.2.1[notice] To update, run: pip install --upgrade
i. At the top of the CREATE APP webpage, there is the text Enter to the virtual environment. To enter to virtual environment. Click on the source /home/{username}/virtualenv/repositories/{project}/3.10/bin/activate && cd /home/{username}/repositories/{project} text which may differ with your case.
ii. Go under the DirectAdmin/Cpanel Dashboard, under System Info & Files
iii. Click Terminal, if you can't see it, it may be that you don't have privileges granted, contact your hosting provider.
- To enter the virtual environment, paste the text copied from step 4e(i) above.
- Type pip install --upgrade pip and press enter. Pip will be upgraded and the issue will be fixed.
- Resume step 3(d)
f. CSS not applied
If you can see your css not being applied to your web pages, do the following
- Install whitenoise by adding
whitenoise == 6.5.0to requirements.txt.
- Add whitenoise.middleware.WhiteNoiseMiddleware, in security.py under the middleware section in settings.py as in 1(c-d).
- and run Run Pip Install, as explained in section 3(d).
f. (mysql.W002) MySQL Strict Mode
This is specific to MySQL database and is normally seen when you are running commands like migrations in the terminal or under Execute python scripts.
(mysql.W002) MySQL Strict Mode is not set for database connection 'default' HINT: MySQL's Strict Mode fixes many data integrity problems in MySQL, such as data truncation upon insertion, by escalating warnings into errors. It is strongly recommended you activate it...
Fix
Add the OPTIONS key to your db settings as shown below. Running migrate, will fix the issue. Take note, this is supposed to run once so make sure to comment or remove the code after running with OPTIONS. Look at section 1(d).
"OPTIONS": {
                 "init_command": "SET sql_mode='STRICT_TRANS_TABLES'",
}, # necessary, run onceDeploying a Django application to DirectAdmin/cPanel is a straightforward process. By following the steps in this article, you'll be able to have your Django application up and running in no time.
